
Creating & Editing Documents
The document editor is a full-page workspace for writing content, managing settings, and publishing. You’ll use the same workspace whether you’re writing a new document from scratch or editing an existing one.
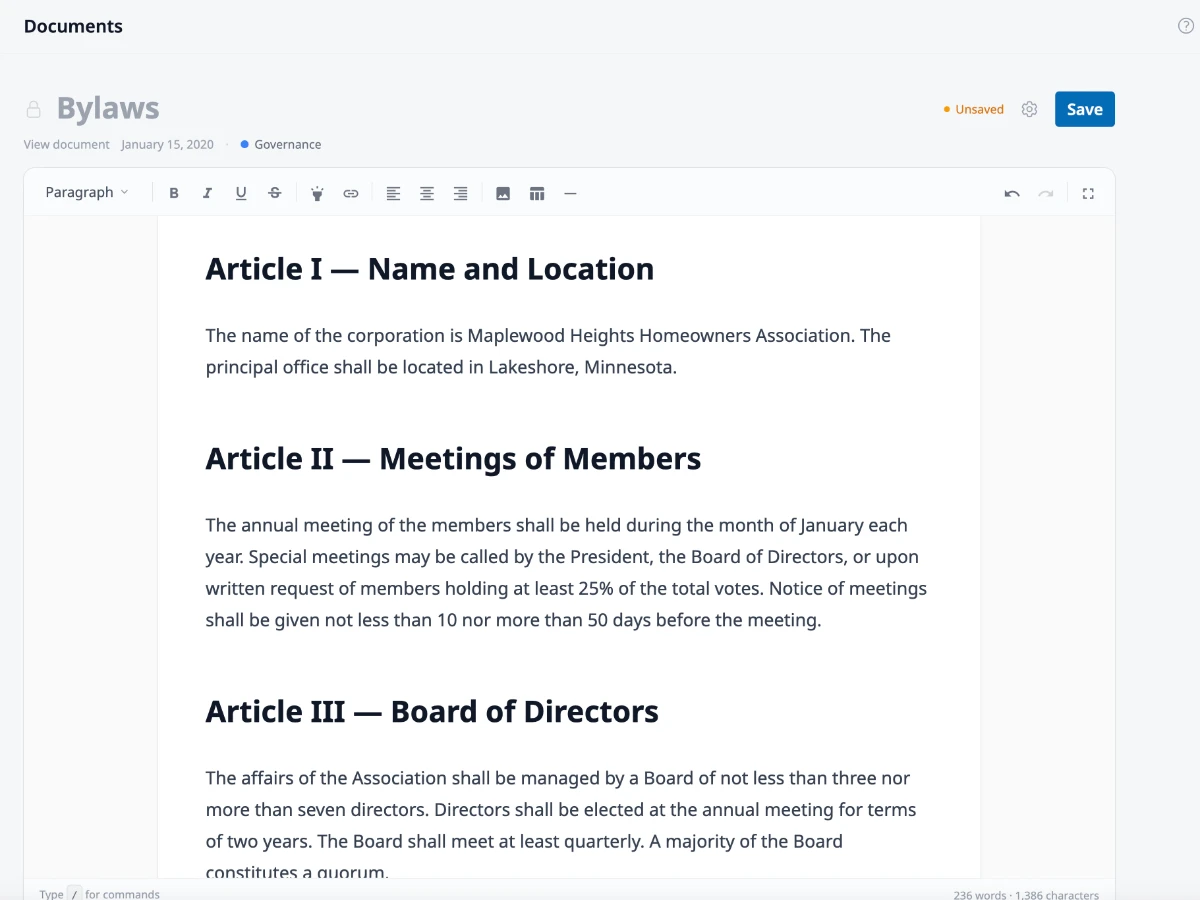
Writing a document from scratch
Section titled “Writing a document from scratch”Not every document starts with a file upload. If you want to write something directly — a policy, announcement, or set of guidelines — click Add Document on the Documents page, then select Write New from the dropdown. This opens the editor workspace with an empty page.
The document type (Standard or Governing) is set in the settings drawer when writing from scratch. Open the drawer with the gear icon to choose the type before you start writing, since it determines whether the document gets version history and amendment support. See Uploading Documents for what the document types mean.
Once you’ve written your content and configured settings, click Save to create the document.
Editing an existing document
Section titled “Editing an existing document”Click Edit from any document view page to open the editor for that document.
The title bar
Section titled “The title bar”The document title is an inline editable field at the top of the page. To the right you’ll find an Unsaved indicator when there are pending changes, a gear icon to open the settings drawer, and the Save button (or Publish for governing documents).
The editor
Section titled “The editor”Toolbar
Section titled “Toolbar”A persistent toolbar sits above the editor with block type selection (paragraph, headings, lists, blockquote, code block), text formatting (bold, italic, underline, strikethrough, highlight), links, alignment, image and table insertion, dividers, undo/redo, and a fullscreen toggle. A word and character count appears in the footer.
Slash commands
Section titled “Slash commands”Type / anywhere in the editor to open an insert menu — a quick way to add headings, lists, tables, blockquotes, dividers, and code blocks without using the toolbar.
Bubble menu
Section titled “Bubble menu”Select any text to reveal a floating formatting menu with bold, italic, underline, strikethrough, highlight, and link options.
Tables
Section titled “Tables”When your cursor is inside a table, a context toolbar appears with controls to add or delete rows and columns.
Fullscreen mode
Section titled “Fullscreen mode”Click the fullscreen button in the toolbar to expand the editor to fill the entire viewport. Press Esc to exit.
Document settings
Section titled “Document settings”Click the gear icon to open the settings drawer on the right side of the page.
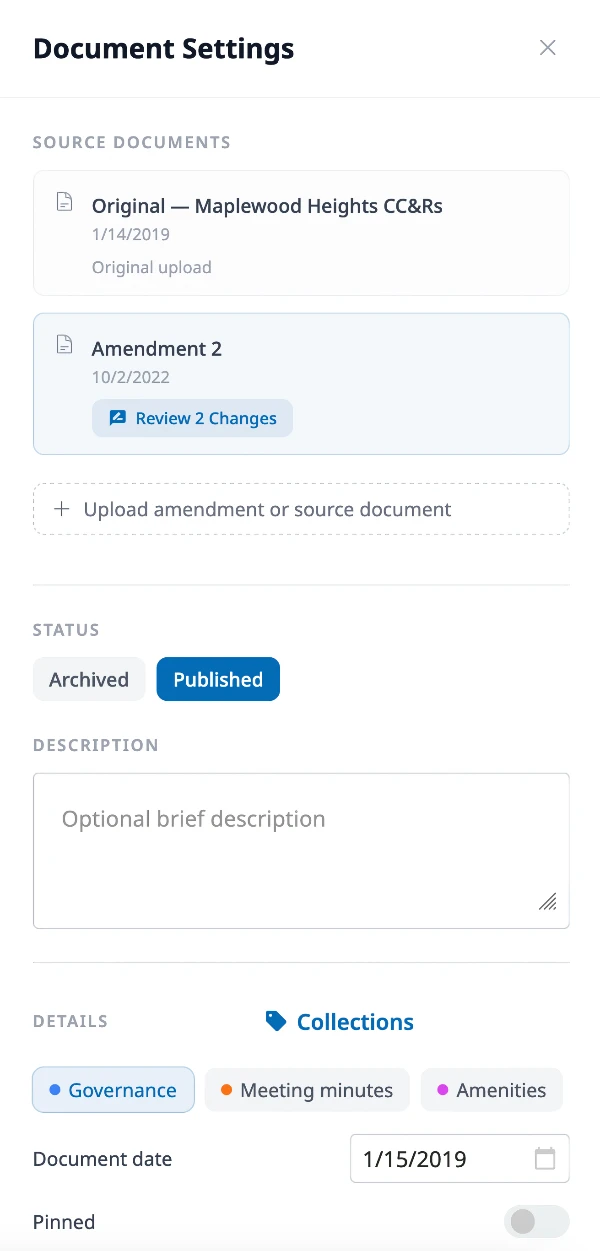
The drawer is organized into sections:
- Document Type (new documents only) — choose Standard or Governing. This can’t be changed after saving.
- Source Documents (governing documents only) — the original upload and any amendments. See Governing Documents & Amendments.
- Status — Draft, Active, or Archived. Processing and Failed are set by the system.
- Description — an optional summary shown on the document view page.
- Details — document date and collections. Click pills to assign or remove collections.
- Access — Public controls whether residents can see the document. Allow editing locks or unlocks the editor to prevent accidental changes to finalized content.
- Pinned — pinned documents appear at the top of the Documents page.
- Attachments (uploaded documents only) — the original uploaded files, preserved even after the content is edited.
- Destructive actions — move the document to trash (recoverable for 30 days).
Saving and publishing
Section titled “Saving and publishing”For standard documents, click Save. Changes are applied immediately.
For governing documents, clicking Publish opens a dialog asking for a brief change summary. This summary is recorded in version history so there’s a record of what changed and why. See Governing Documents & Amendments for more.
Regenerating content from source files
Section titled “Regenerating content from source files”If an uploaded document’s extracted content doesn’t look right — scrambled text, missing sections, or broken formatting — open the settings drawer and click Regenerate to re-extract from the original files.