
Setting Up Billing
Before residents can be billed, you’ll need to define what they owe and configure a few community-wide preferences. This is typically one of the first things to set up when getting your community started with billing.
Create a charge
Section titled “Create a charge”Go to Billing → Dashboard, click the arrow next to Create invoice, and choose Charges. Then click New Charge. Until you create your first charge, the Set up billing card on the dashboard also has a Create charge button. A charge needs:
- Charge Name — something residents will recognize, like “Annual Assessment” or “Pool Key Rental”
- Amount ($)
- Charge Type — Regular Assessment, Special Assessment, Fee, or Fine. Late fees and reimbursements aren’t charges; see Understanding Billing in HOA Hub
- Interval — Monthly, Quarterly, Semi-Annual, Annual, or One-Time
- Billing Start Month (for Quarterly, Semi-Annual, or Annual charges) and Billing Day (1–28, not used for One-Time charges) — together these set the anchor date the charge renews from
- Due Days — how many days after the billing date payment is due
- Fund — Operating or Reserve
- Income Account — the GL account the charge’s invoice revenue posts to in Accounting
If your community uses departments, a department field appears too. Revenue from the charge is reported under the department you pick, or under General if you leave it blank.
Once created, the charge opens on its own page. Come back to it from the Charges list to edit its details, manage installment options, or see which properties it’s assigned to. Edit Charge also has an Active switch: an inactive charge stops generating new invoices.
Installment options
Section titled “Installment options”Every new charge starts with a Pay in Full option, set as the default, plus disabled presets that match its interval: Semi-Annual (2), Quarterly (4), and Monthly (12) payments for an Annual charge, Monthly (6) for a Semi-Annual charge, and Monthly (3) for a Quarterly charge. To offer one, click its pencil icon and turn on Enabled.
Click Add Option to create your own. Each option has:
- A Label (e.g., “Quarterly”)
- The Number of Installments, up to 12
- Set as default — whether new assignments use this option
- An optional installment fee — Fee Type is No Fee, Flat Amount, or Percentage, added to each installment invoice
- Enabled — disabled options are hidden from residents
Options can be edited or deleted from the same page; an option that properties are using can’t be deleted. Residents can switch their own installment plan for future invoices from their property’s Billing tab when more than one option is enabled — see Paying Your Assessments.
Assign properties to a charge
Section titled “Assign properties to a charge”From a charge’s detail page, click Assign Properties to apply it to one or more properties in your community. Each assignment can be removed independently without affecting the charge itself or other properties’ history.
Billing settings
Section titled “Billing settings”The rest of your community’s billing configuration is on the Billing Settings page. Go to Billing → Dashboard, click the arrow next to Create invoice, and choose Billing settings.
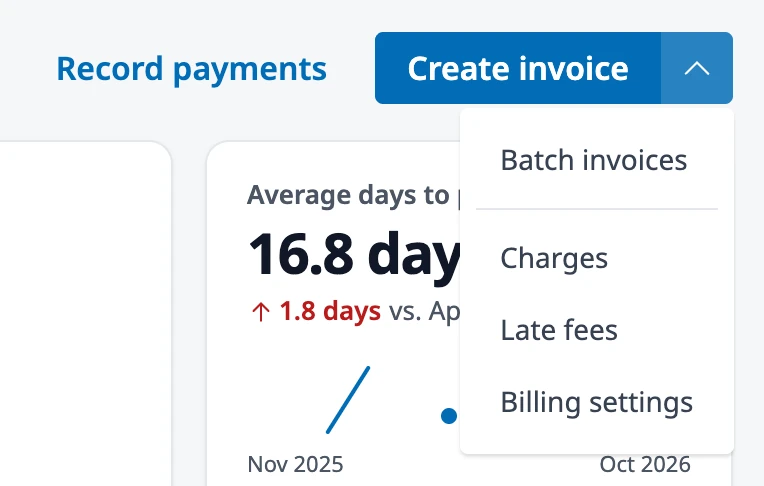
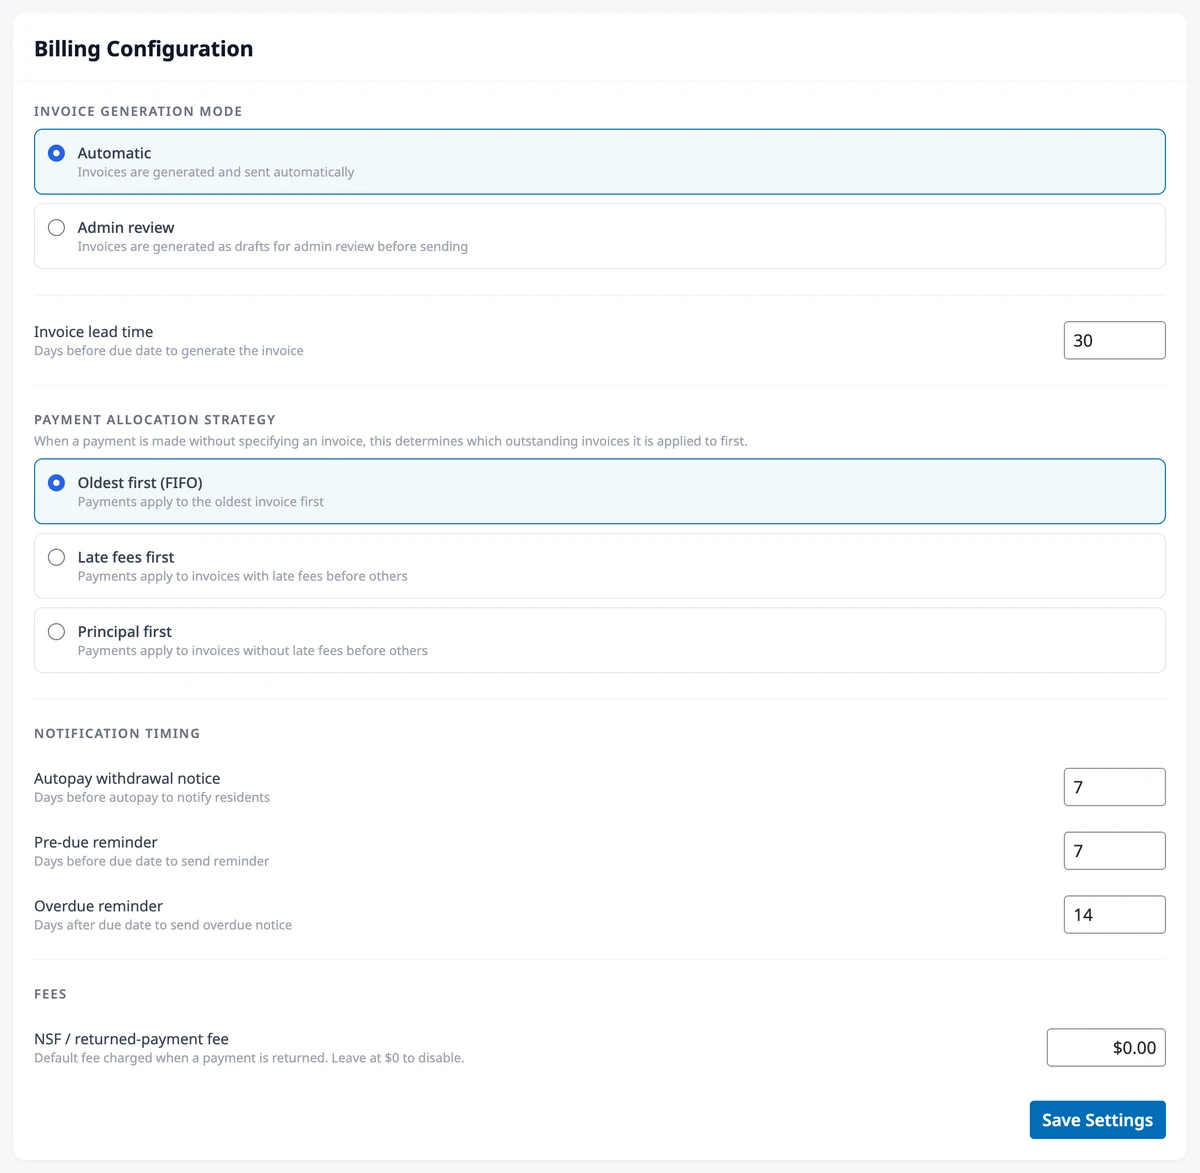
Change what you need in the Billing Configuration card and click Save Settings. Billing Managers can open this page and change these settings too.
The General Ledger mapping your exports use is on its own page, General Ledger Account Mapping. Open it from the General Ledger Mapping link on the Billing Settings page. When Accounting is turned off, GL mapping is also in the Create invoice menu on the dashboard.
Invoice generation mode
Section titled “Invoice generation mode”- Automatic — invoices are generated and sent to residents automatically on schedule.
- Admin review — invoices are generated as drafts for you to review before sending.
Invoice lead time sets how many days before the due date an invoice is generated (30 by default).
Payment allocation strategy
Section titled “Payment allocation strategy”Determines which invoice a payment applies to when it isn’t recorded against a specific one:
- Oldest first (FIFO) — the default. Payments apply to the oldest open invoice first.
- Late fees first — payments apply to invoices carrying late fees before others.
- Principal first — payments apply to invoices without late fees before others.
Notification timing
Section titled “Notification timing”Three settings control when residents are emailed:
- Autopay withdrawal notice — days before an autopay charge (7 by default). It needs Stripe connected
- Pre-due reminder — days before the due date (7 by default)
- Overdue reminder — days after the due date (14 by default). The reminder repeats at that interval until the invoice is paid
Set any of them to 0 to turn that email off.
The NSF / returned-payment fee is the default fee applied when a payment is returned — see Transactions and exports. Leave it at $0 to disable.
The Transaction fee pass-through (convenience fee) is in the Payment Processing card at the top of the page. It only appears once Stripe is connected, and it saves as soon as you switch it — see Connecting Stripe / Online Payments.
Remittance information
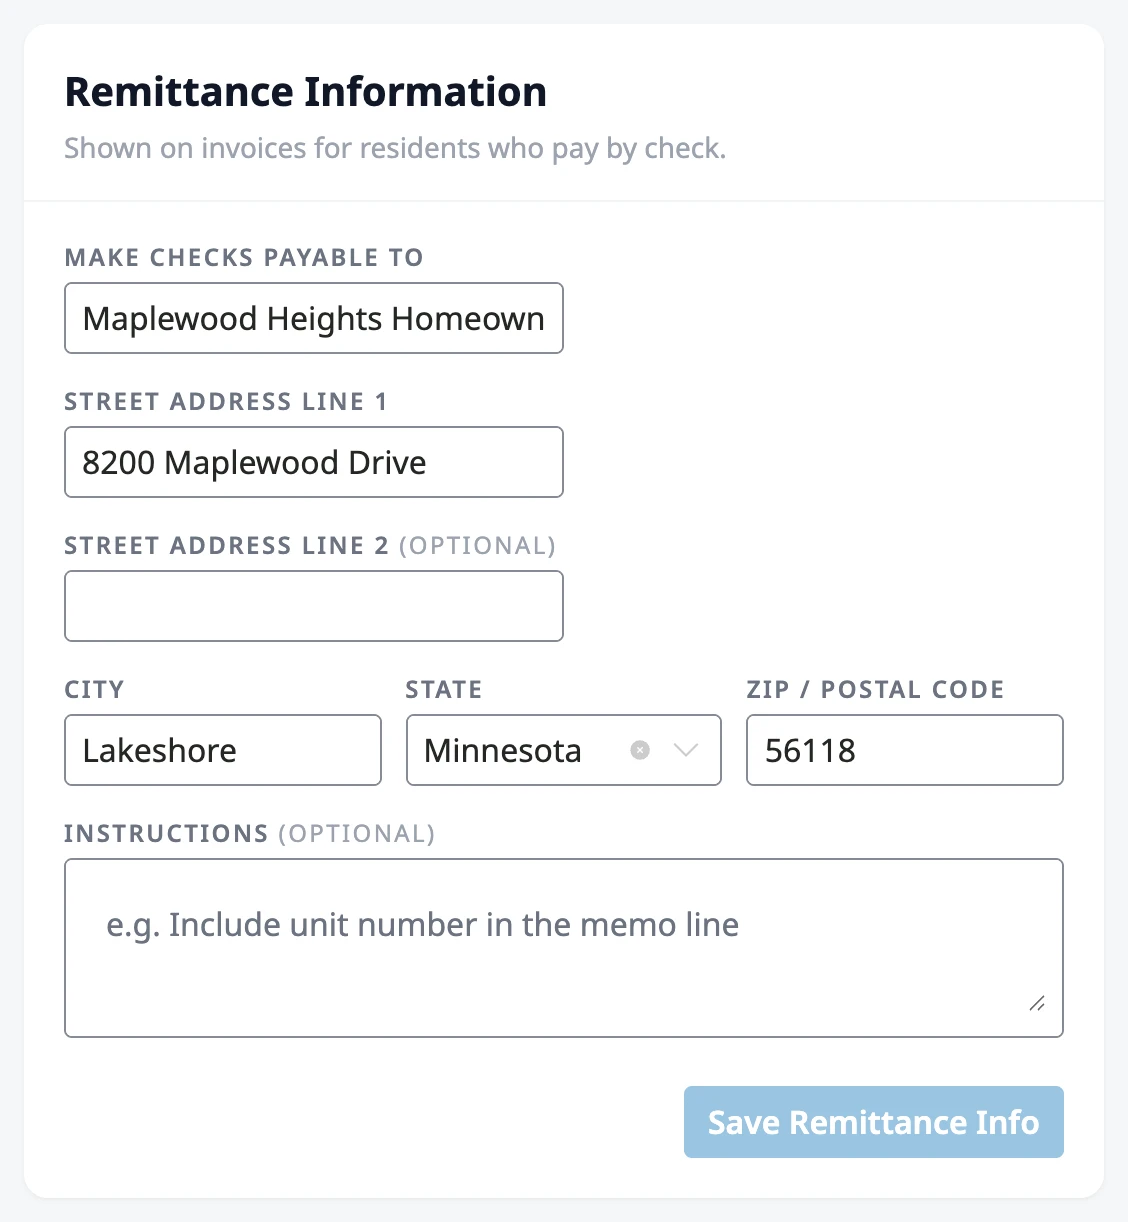
Section titled “Remittance information”The Remittance Information card sets where residents who pay by check send it. Once Make checks payable to is filled in, residents see the payee, the mailing address, and any Instructions on every invoice that still has a balance due. Make checks payable to, Street address line 1, City, State, and ZIP / Postal code must be filled in together. The card has its own Save Remittance Info button.
Where to go next
Section titled “Where to go next”- Ready to work a specific property? See Managing a property’s billing.
- Need to bill residents now? See Creating invoices and recording payments.
- Want to charge late fees automatically? See Late fees and payment arrangements.
- Taking payments online? See Connecting Stripe / Online Payments.
- Tracking charge revenue by cost center? See Departments.